Category: Infrastructure

What to do when you get stuck in a Vim editor

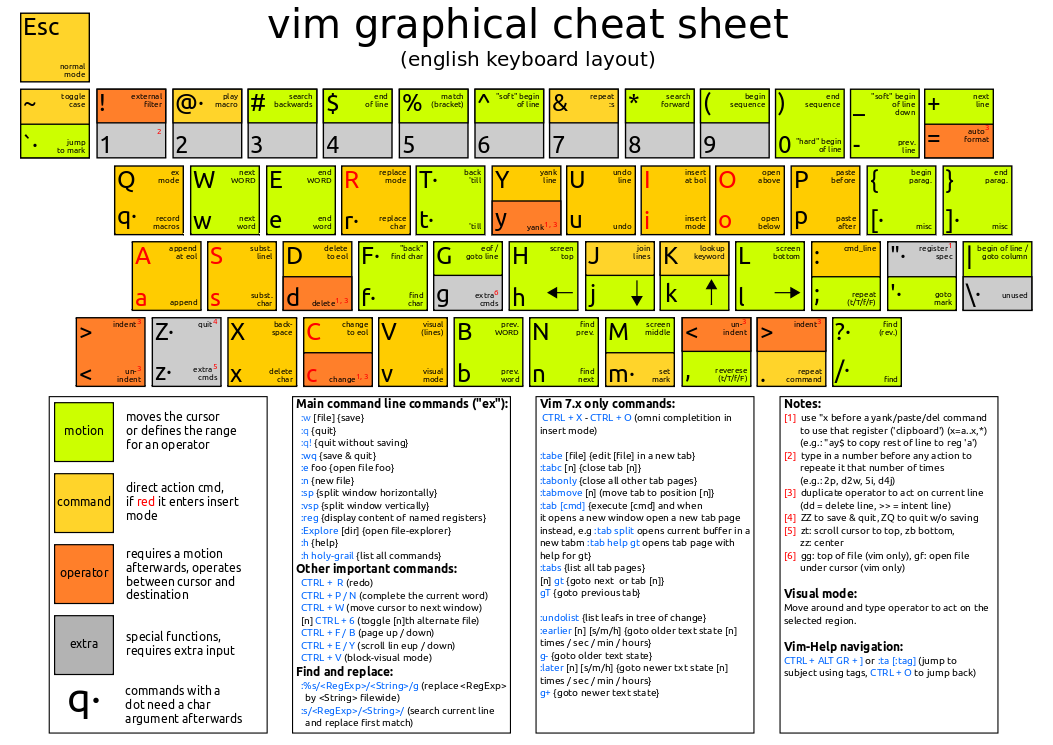
Anybody using Git straight out of the box on the command line is likely to have found themselves suddenly stuck in a Vim editor. If you’re not used to Vim, this can be a highly discombobulating experience. Here’s how to escape!

  • Quick Guide:
    • Type i to get into insert mode
      • (no need for colon)
      • (if it’s worked, you’ll see “– INSERT –” at bottom of screen
    • Type your commit message
    • Click Esc
    • Type :wq to save and quit
      • Or type :q! to quit without saving
    • Hit Enter

Changing your Default Git Editor

  • You don’t have to have Vim as your default editor! You can change to an editor of your choice (eg Notepad)
  • Note that these instructions were written for Windows. I don’t know about other operating systems but I’m guessing it’ll be similar
    • Find and open your .gitconfig file
      • (probably here: C:\Users\[user-name])
    • Add this section to the bottom:
      • [core]
      • editor = ‘C:/Program Files (x86)/Notepad++/notepad++.exe’
    • Save and close the file.
    • When you’re committing with git, just write git commit and press Enter. It will pop open Notepad++.
    • Write your commit message at the top of the file, and save and close the file. Done!
      • …but it doesn’t always work like that, in which case you might have to go back to VIM and just learn the VIM basics
  • More here: http://stackoverflow.com/questions/2596805/how-do-i-make-git-use-the-editor-of-my-choice-for-commits

Searching and search / replace in Vim

(Note that this was written after I spent a few months learning Vim. If you’re just stuck in Vim and want to get out, see What to do when you get stuck in a Vim editor).

I’m publishing my notes on the things that are useful in Vim but that I keep forgetting. My notes are split into four sections, so I’ll publish four posts:

This is the fourth post, and it’s about searching  and search / replace in Vim.

Search for term in file

  • Like this: /[search term – regex]
  • Type n to get next search result
  • Type N to get previous search result
  • For case insensitive search, add \c to the command (either at start or end)
  • If you then get highlighting which won’t go away, type :noh

Search and replace

  • Like this: :%s/[search term]/[replacement]/g
    • %s means whole file, /g means every occurrence on every line
    • If you want it to ask you for confirmation on every replacement, add c as well: :%s/foo/bar/gc
    • More here: https://vim.fandom.com/wiki/Search_and_replace
    • And here: https://www.linux.com/learn/vim-tips-basics-search-and-replace
    • If your strings contain forward slashes, then you can replace the forward slashes in the command with any other character!
    • For case insensitive search, add \c to the command (either at start or end)
    • To do it on whole words only: :%s/\<word\>/newword/g – you have to delimit the word with \< and \>

Find character on this line

  • f – find character on this line
    • Add a number to do multiple
    • Eg 2f_ will find the second underscore character on this line

Find the word under the cursor

  • This: *
    • This works on words containing underscores
    • By default it won’t work on words containing hyphens
      • You can change this by adding set iskeyword+=- to .vimrc
      • Or just type :set isk+=- in Vim

Find whatever text you have highlighted (in visual mode)

Navigating files, lines and blocks in Vim

(Note that this was written after I spent a few months learning Vim. If you’re just stuck in Vim and want to get out, see What to do when you get stuck in a Vim editor).

I’m publishing my notes on the things that are useful in Vim but that I keep forgetting. My notes are split into four sections, so I’ll publish four posts:

This is the third post, and it’s about navigating files, lines and blocks in Vim.

Navigating lines

Navigating files

  • Go to top of file: gg
  • Go to end of file: shift + g
  • Go to line number: line-number + shift + g
  • Navigation within chars / lines: j = down, k = up, h = left, l = right

Navigating blocks delineated by {}, (), [], <> or “”

  • The diff between % and [{ always confuses me cos it’s not explained well in Vim Adventures:
    • % will take you to the matching bracket if you are already ON a bracket. It only works on {}, () and [] (not <>)
    • [{ will search backwards for the enclosing { if you are already IN a {} block – so it takes you to the start of your current scope
      • ]} will move forwards and take you to the end of your current scope
      • ]{ is meaningless (I think)
      • [( and )] will also work in the same way
      • [< does not work, [“ does not work, and [[ does something totally different
      • If you want to move back to blocks that enclose your current block, use numbers
        • So for instance, 3[{ will take you to the beginning of this snippet of code if your cursor is in the innermost scope:
        • {
          • {
            • {I am here}
          • }
        • }
      • In Vim Adventures type :help [{

If you want to navigate inside a block delineated by [], <> or “”

  • You can use % to find the matching brace if you are on [ or ] but not < or >
  • You can use visual mode to select the contents of {}, [], (), <> or “”
    • Use a to select the contents AND the delineators
    • Use i to select the inner contents (ie without the delineators)
    • Use the OPENING delineator to indicate what your scope is
    • These are all the possible commands: va{, vi{, va[, vi[, va(, vi(, va<, vi<, va”, vi”
    • If you want to select blocks that enclose your current block, use numbers
      • So for instance, v3a{ will select this whole snippet of code if your cursor is in the innermost scope:
      • {
        • {
          • {I am here}
        • }
      • }
    • Once you’re in visual mode you can use commands like i, p, c, a, s
    • In Vim Adventures type :help a{ or help i{
      • You can use c to select the contents of {}, [], (), <> or “” and then it will put you into Insert mode to replace what was there
        • Same principles as with v (see above)
        • These are all the possible commands: ca{, ci{, ca[, ci[, ca(, ci(, ca<, ci<, ca”, ci”
        • As with v you can use numbers to select multiple enclosing blocks (see above) but the number comes BEFORE c, like this: 3ca{
        • (There are others too, like caw and ciw for words – in Vim Adventures type :help aw and :help iw)

Vertical Columns in Vim (“visual blocks”)

(Note that this was written after I spent a few months learning Vim. If you’re just stuck in Vim and want to get out, see What to do when you get stuck in a Vim editor).

I’m publishing my notes on the things that are useful in Vim but that I keep forgetting. My notes are split into four sections, so I’ll publish four posts:

This is the second post, and it’s about vertical columns of text (“visual blocks”). It’s the same functionality that you get using alt + click in a lot of other text editors.

  • Ctrl + v takes you into “visual block” mode, then use the up and down arrows.
  • Commands like x will work instantly
  • But if you want to do something like substitute (s) or append (A only, a won’t work) or change (c), you need to execute the full command first – at which point it will look like it’s only worked on one line – and then press Esc twice – and finally your change will appear on multiple lines.
  • If you want to type replacement text, you use insert mode but it has to be I instead of i (upper case instead of lower case). As with s, a and c you won’t see the full effect until you exit Insert mode AND visual mode (press Esc twice).
  • To insert one vertical column of text in front of another one:
    • Go to the place you’re copying from
    • Use ctrl+v to go into visual block mode
    • Use y to copy the highlighted text
    • Go to your destination
    • Use ctrl+v to select a column of text consisting of the first character of the place you want your new column to go in front of
    • Use I to go into insert mode, and type one space
    • Press Esc, and you’ll see you have inserted a column of single spaces
    • Now use ctrl+v again to highlight the column of spaces
    • Use p to paste your original column selection
    • There is an explanation here for why you can’t do it without typing the extra space: https://stackoverflow.com/questions/31893732/vim-how-do-i-paste-a-column-of-text-from-clipboard-after-a-different-column-o


Miscellaneous Vim Stuff

Note that this was written after I spent a few months learning Vim. If you’re just stuck in Vim and want to get out, see What to do when you get stuck in a Vim editor.

This will be another notey one. Really I just want to stick this somewhere I can easily access it. I’m going to publish my notes on the things that are useful in Vim but that I keep forgetting. My notes are split into four sections, so I’ll publish four posts:

Before I get going though, a mildly funny anecdote: A colleague messaged me recently and mentioned that his vim had been upset by some house renovation work, and I wondered how said renovation could have such an impact on his command-line text editor…. before I realised that he meant vim as in “vim and vigour”.

OK, so here is some miscellaneous Vim stuff:

  • Vim cheat sheet – http://hamwaves.com/vim.tutorial/images/vim.en.png
  • Great online “Vim Adventures” game you can use to learn Vim: https://vim-adventures.com/
  • If you make changes to ~/.vimrc and want to reload:
    • Type :so $MYVIMRC
    • …but actually you can just type $MY and then tab to autocomplete.
  • Searching:
  • Navigating files, lines, blocks
  • Copy / paste:
    • Copy current line (“yank”): yy – which is the same as Y
    • Paste current line below the line you are on (“put”): p
    • To replace one line with another: Y to yank a line, then go to the line you want to replace and type Vp
      • V puts the whole line into visual mode, and then p pastes the register into the visual selection (the whole line).
  • Append, Substitute and Change
    • Append is a to append after current character or A to append at end of line
      • (puts you into insert mode)
    • Substitute is s to substitute current character and S to substitute current line
      • (puts you into insert mode)
    • Change is c to replace whatever you specify – eg aw for a word, iw for inner word (word without leading space)
      • (puts you into insert mode)
      • C is to replace from cursor to end of line
      • See also separate section below on navigating blocks
  • Replace current word with contents of register: viwp
    • v is visual mode
    • iw is inner word
    • p is put
    • You might want to explicitly use the “0 register (like this: viw”0p), otherwise what’s in the default register might get replaced and if you try to repeat the action you get unexpected results
      • But for this to work, you will have to have used “0y (or whatever) first, to get your text into the correct register
  • Select a vertical column of text (like alt click)
  • Text objects:
  • To see line numbers: :set number
    • To make that change (or any other change) permanent:
      • Cmd: vim ~/.vimrc
      • Type the line :set number into the file
      • It will take effect immediately
    • To turn line numbers off temporarily (for copy/pasting): :se nonu (then :se number to turn them back on again)
  • Do one command while in Insert mode, then return to Insert mode: Ctrl + o
    • This takes you to normal mode for one command
  • Most commands in vim take a function and then an argument
    • Eg j is a movement argument – so dj is the delete command with a “down” argument
    • Commonly repeat the function if there is no argument – so dd means just delete
  • u – undo
  • Ctrl + r – Redo
  • o – insert new line below (O = above)
    • Note this will also put you in insert mode
  • Tab (indent) left or right: < and > – eg << to just tab left
    • To indent a whole block: Use v to go into visual mode, then up and down keys to select lines, then < and > to indent in or out
  • Select an entire function definition
  • Set to use spaces instead of tabs
    • Cmd: :set expandtab ts=2 sw=2
    • ts = tabstop
      • Note this means that you can use the tab command and it will automatically insert 2 spaces
      • It also defines how he file will be displayed if it contains tab characters
    • sw = Shiftwidth
      • Something to do with what happens when you press enter, – automatic indentations?
  • Multiples
    • Add number at start
    • Eg 2f_ – find the second instance of underscore on this line
  • Delete characters – x for the char in front, X for the char behind (like backspace)
  • d – delete line
    • dd – delete current line
    • 4dd – delete 4 lines
    • dG – Delete all lines from current line to end of file
    • Shift+d – delete to end of line
    • Shift+c – delete to end of line and go into insert mode
    • dw – delete a word
  • J to join text that’s split across lines to turn it into one long string
    • Eg This…
      • Hey
        • Hello
          • You
        • And also
      • Goodbye
    • … becomes this:
      • Hey Hello You And also Goodbye

A Simple explanation of the CIDR IP address scheme

I really struggled to find an explanation of CIDR addresses that used plain language and didn’t assume a lot of esoteric knowledge, so I’m writing some simple notes here.
With a CIDR address, you get something that looks like an IP address but then you get /nn at the end.

Like this: 123.231.145.0/24

Instead of specifying one IP address, this represents a range of IP addresses.

Decoding a CIDR address

If you want to decode a CIDR address, you can use this useful tool. If you give it your CIDR address, it will tell you the first IP in the range, the last IP, the total number of hosts and more.

Reading a CIDR address

So what does it mean?

The number at the end specifies how many bits of the IP address will be used for the network address. The rest of the bits will be used for host addresses.

There are always 32 bits available, because the highest IP address is 255.255.255.255. If those numbers were written in binary instead of decimal, each of the 255s would require 8 bits (255 is 11111111).

In the example above (123.231.145.0/24), 24 bits are used for the network address and this leaves 8 bits (32 minus 24) for the host addresses.

The range of numbers you can create when you have 8 bits is 256 (from 0000000 to 11111111), so if you have 8 bits available for host addresses, the number of host addresses is 256.

This means that in our example, the actual range of IP addresses described is 123.231.145.0 to 123.231.145.255.

The first three decimals (123.231.145) are the fixed network address, and will use up 24 bits when expressed in binary. The last decimal (which in our example will take values ranging from 0 to 255) uses up the last 8 bits.

A useful table

You can use the table below (via) to find out how many IP addresses are represented by the number after the forward slash (in our case, that number is 24).

The “decimal” column is telling you how many IP addresses will be in the range.

The “class” refers to the old way of allocating IP addresses, where class A was a range of over 16 million addresses, class B was a range of 65,535 addresses and class C was a range of 254 addresses. More here: https://www.keycdn.com/support/what-is-cidr

The “mask” refers to bit multiplication / bitwise operations, which is a whole other topic.