Month: November 2019

What to do when you get stuck in a Vim editor

Anybody using Git straight out of the box on the command line is likely to have found themselves suddenly stuck in a Vim editor. If you’re not used to Vim, this can be a highly discombobulating experience. Here’s how to escape!

  • Quick Guide:
    • Type i to get into insert mode
      • (no need for colon)
      • (if it’s worked, you’ll see “– INSERT –” at bottom of screen
    • Type your commit message
    • Click Esc
    • Type :wq to save and quit
      • Or type :q! to quit without saving
    • Hit Enter

Changing your Default Git Editor

  • You don’t have to have Vim as your default editor! You can change to an editor of your choice (eg Notepad)
  • Note that these instructions were written for Windows. I don’t know about other operating systems but I’m guessing it’ll be similar
    • Find and open your .gitconfig file
      • (probably here: C:\Users\[user-name])
    • Add this section to the bottom:
      • [core]
      • editor = ‘C:/Program Files (x86)/Notepad++/notepad++.exe’
    • Save and close the file.
    • When you’re committing with git, just write git commit and press Enter. It will pop open Notepad++.
    • Write your commit message at the top of the file, and save and close the file. Done!
      • …but it doesn’t always work like that, in which case you might have to go back to VIM and just learn the VIM basics
  • More here: http://stackoverflow.com/questions/2596805/how-do-i-make-git-use-the-editor-of-my-choice-for-commits

Searching and search / replace in Vim

(Note that this was written after I spent a few months learning Vim. If you’re just stuck in Vim and want to get out, see What to do when you get stuck in a Vim editor).

I’m publishing my notes on the things that are useful in Vim but that I keep forgetting. My notes are split into four sections, so I’ll publish four posts:

This is the fourth post, and it’s about searching  and search / replace in Vim.

Search for term in file

  • Like this: /[search term – regex]
  • Type n to get next search result
  • Type N to get previous search result
  • For case insensitive search, add \c to the command (either at start or end)
  • If you then get highlighting which won’t go away, type :noh

Search and replace

  • Like this: :%s/[search term]/[replacement]/g
    • %s means whole file, /g means every occurrence on every line
    • If you want it to ask you for confirmation on every replacement, add c as well: :%s/foo/bar/gc
    • More here: https://vim.fandom.com/wiki/Search_and_replace
    • And here: https://www.linux.com/learn/vim-tips-basics-search-and-replace
    • If your strings contain forward slashes, then you can replace the forward slashes in the command with any other character!
    • For case insensitive search, add \c to the command (either at start or end)
    • To do it on whole words only: :%s/\<word\>/newword/g – you have to delimit the word with \< and \>

Find character on this line

  • f – find character on this line
    • Add a number to do multiple
    • Eg 2f_ will find the second underscore character on this line

Find the word under the cursor

  • This: *
    • This works on words containing underscores
    • By default it won’t work on words containing hyphens
      • You can change this by adding set iskeyword+=- to .vimrc
      • Or just type :set isk+=- in Vim

Find whatever text you have highlighted (in visual mode)

Navigating files, lines and blocks in Vim

(Note that this was written after I spent a few months learning Vim. If you’re just stuck in Vim and want to get out, see What to do when you get stuck in a Vim editor).

I’m publishing my notes on the things that are useful in Vim but that I keep forgetting. My notes are split into four sections, so I’ll publish four posts:

This is the third post, and it’s about navigating files, lines and blocks in Vim.

Navigating lines

Navigating files

  • Go to top of file: gg
  • Go to end of file: shift + g
  • Go to line number: line-number + shift + g
  • Navigation within chars / lines: j = down, k = up, h = left, l = right

Navigating blocks delineated by {}, (), [], <> or “”

  • The diff between % and [{ always confuses me cos it’s not explained well in Vim Adventures:
    • % will take you to the matching bracket if you are already ON a bracket. It only works on {}, () and [] (not <>)
    • [{ will search backwards for the enclosing { if you are already IN a {} block – so it takes you to the start of your current scope
      • ]} will move forwards and take you to the end of your current scope
      • ]{ is meaningless (I think)
      • [( and )] will also work in the same way
      • [< does not work, [“ does not work, and [[ does something totally different
      • If you want to move back to blocks that enclose your current block, use numbers
        • So for instance, 3[{ will take you to the beginning of this snippet of code if your cursor is in the innermost scope:
        • {
          • {
            • {I am here}
          • }
        • }
      • In Vim Adventures type :help [{

If you want to navigate inside a block delineated by [], <> or “”

  • You can use % to find the matching brace if you are on [ or ] but not < or >
  • You can use visual mode to select the contents of {}, [], (), <> or “”
    • Use a to select the contents AND the delineators
    • Use i to select the inner contents (ie without the delineators)
    • Use the OPENING delineator to indicate what your scope is
    • These are all the possible commands: va{, vi{, va[, vi[, va(, vi(, va<, vi<, va”, vi”
    • If you want to select blocks that enclose your current block, use numbers
      • So for instance, v3a{ will select this whole snippet of code if your cursor is in the innermost scope:
      • {
        • {
          • {I am here}
        • }
      • }
    • Once you’re in visual mode you can use commands like i, p, c, a, s
    • In Vim Adventures type :help a{ or help i{
      • You can use c to select the contents of {}, [], (), <> or “” and then it will put you into Insert mode to replace what was there
        • Same principles as with v (see above)
        • These are all the possible commands: ca{, ci{, ca[, ci[, ca(, ci(, ca<, ci<, ca”, ci”
        • As with v you can use numbers to select multiple enclosing blocks (see above) but the number comes BEFORE c, like this: 3ca{
        • (There are others too, like caw and ciw for words – in Vim Adventures type :help aw and :help iw)

Vertical Columns in Vim (“visual blocks”)

(Note that this was written after I spent a few months learning Vim. If you’re just stuck in Vim and want to get out, see What to do when you get stuck in a Vim editor).

I’m publishing my notes on the things that are useful in Vim but that I keep forgetting. My notes are split into four sections, so I’ll publish four posts:

This is the second post, and it’s about vertical columns of text (“visual blocks”). It’s the same functionality that you get using alt + click in a lot of other text editors.

  • Ctrl + v takes you into “visual block” mode, then use the up and down arrows.
  • Commands like x will work instantly
  • But if you want to do something like substitute (s) or append (A only, a won’t work) or change (c), you need to execute the full command first – at which point it will look like it’s only worked on one line – and then press Esc twice – and finally your change will appear on multiple lines.
  • If you want to type replacement text, you use insert mode but it has to be I instead of i (upper case instead of lower case). As with s, a and c you won’t see the full effect until you exit Insert mode AND visual mode (press Esc twice).
  • To insert one vertical column of text in front of another one:
    • Go to the place you’re copying from
    • Use ctrl+v to go into visual block mode
    • Use y to copy the highlighted text
    • Go to your destination
    • Use ctrl+v to select a column of text consisting of the first character of the place you want your new column to go in front of
    • Use I to go into insert mode, and type one space
    • Press Esc, and you’ll see you have inserted a column of single spaces
    • Now use ctrl+v again to highlight the column of spaces
    • Use p to paste your original column selection
    • There is an explanation here for why you can’t do it without typing the extra space: https://stackoverflow.com/questions/31893732/vim-how-do-i-paste-a-column-of-text-from-clipboard-after-a-different-column-o


Miscellaneous Vim Stuff

Note that this was written after I spent a few months learning Vim. If you’re just stuck in Vim and want to get out, see What to do when you get stuck in a Vim editor.

This will be another notey one. Really I just want to stick this somewhere I can easily access it. I’m going to publish my notes on the things that are useful in Vim but that I keep forgetting. My notes are split into four sections, so I’ll publish four posts:

Before I get going though, a mildly funny anecdote: A colleague messaged me recently and mentioned that his vim had been upset by some house renovation work, and I wondered how said renovation could have such an impact on his command-line text editor…. before I realised that he meant vim as in “vim and vigour”.

OK, so here is some miscellaneous Vim stuff:

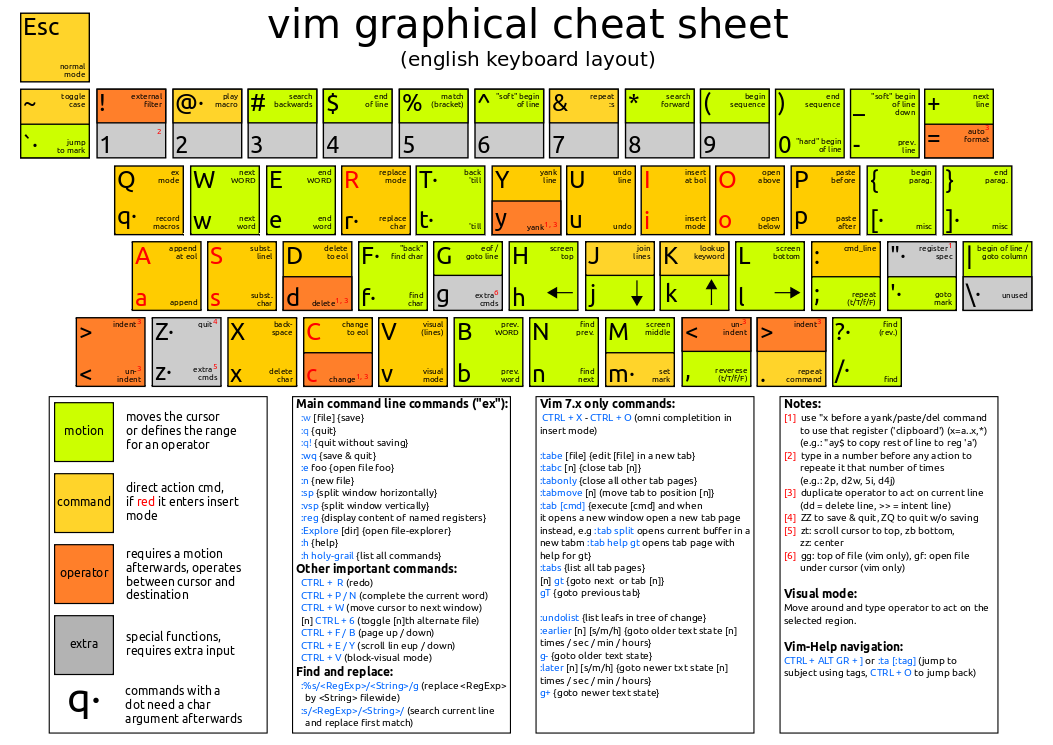
  • Vim cheat sheet – http://hamwaves.com/vim.tutorial/images/vim.en.png
  • Great online “Vim Adventures” game you can use to learn Vim: https://vim-adventures.com/
  • If you make changes to ~/.vimrc and want to reload:
    • Type :so $MYVIMRC
    • …but actually you can just type $MY and then tab to autocomplete.
  • Searching:
  • Navigating files, lines, blocks
  • Copy / paste:
    • Copy current line (“yank”): yy – which is the same as Y
    • Paste current line below the line you are on (“put”): p
    • To replace one line with another: Y to yank a line, then go to the line you want to replace and type Vp
      • V puts the whole line into visual mode, and then p pastes the register into the visual selection (the whole line).
  • Append, Substitute and Change
    • Append is a to append after current character or A to append at end of line
      • (puts you into insert mode)
    • Substitute is s to substitute current character and S to substitute current line
      • (puts you into insert mode)
    • Change is c to replace whatever you specify – eg aw for a word, iw for inner word (word without leading space)
      • (puts you into insert mode)
      • C is to replace from cursor to end of line
      • See also separate section below on navigating blocks
  • Replace current word with contents of register: viwp
    • v is visual mode
    • iw is inner word
    • p is put
    • You might want to explicitly use the “0 register (like this: viw”0p), otherwise what’s in the default register might get replaced and if you try to repeat the action you get unexpected results
      • But for this to work, you will have to have used “0y (or whatever) first, to get your text into the correct register
  • Select a vertical column of text (like alt click)
  • Text objects:
  • To see line numbers: :set number
    • To make that change (or any other change) permanent:
      • Cmd: vim ~/.vimrc
      • Type the line :set number into the file
      • It will take effect immediately
    • To turn line numbers off temporarily (for copy/pasting): :se nonu (then :se number to turn them back on again)
  • Do one command while in Insert mode, then return to Insert mode: Ctrl + o
    • This takes you to normal mode for one command
  • Most commands in vim take a function and then an argument
    • Eg j is a movement argument – so dj is the delete command with a “down” argument
    • Commonly repeat the function if there is no argument – so dd means just delete
  • u – undo
  • Ctrl + r – Redo
  • o – insert new line below (O = above)
    • Note this will also put you in insert mode
  • Tab (indent) left or right: < and > – eg << to just tab left
    • To indent a whole block: Use v to go into visual mode, then up and down keys to select lines, then < and > to indent in or out
  • Select an entire function definition
  • Set to use spaces instead of tabs
    • Cmd: :set expandtab ts=2 sw=2
    • ts = tabstop
      • Note this means that you can use the tab command and it will automatically insert 2 spaces
      • It also defines how he file will be displayed if it contains tab characters
    • sw = Shiftwidth
      • Something to do with what happens when you press enter, – automatic indentations?
  • Multiples
    • Add number at start
    • Eg 2f_ – find the second instance of underscore on this line
  • Delete characters – x for the char in front, X for the char behind (like backspace)
  • d – delete line
    • dd – delete current line
    • 4dd – delete 4 lines
    • dG – Delete all lines from current line to end of file
    • Shift+d – delete to end of line
    • Shift+c – delete to end of line and go into insert mode
    • dw – delete a word
  • J to join text that’s split across lines to turn it into one long string
    • Eg This…
      • Hey
        • Hello
          • You
        • And also
      • Goodbye
    • … becomes this:
      • Hey Hello You And also Goodbye